Tuesday, June 16, 2015

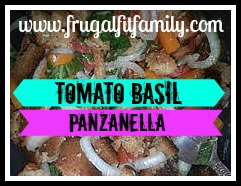
TOMATO BASIL PANZANELLA RECIPE

 
My kids will NOT eat the crusts of bread so when I began my frugal-organic mission, I wasn't about to waste anything! So, I decided to start removing the crusts of the bread BEFORE making the sandwiches! I ended up with lots of bags of crusts in the fridge so I had  to come up with TONS of ways to use them - Check out 10 ways to use bread crusts -they were all pretty good but my favorite has to be the Panzeanella! It is a crowd pleaser and looks so refined that no one would guess that it was actually something that would have been discarded!

My recipes are very simple and please feel free to change up any of the ingredients. I have not indicated amounts because this dish varies based on the leftovers I have, what is in the fridge, and how much bread crust I have on hand so use your intuition and your taste buds!
 
HOMEMADE TOMATO BASIL PANZANELLA 


Ingredients: 
  • Cubed Stale bread (any kind) you can also use fresh bread! Just toast it up in the oven first (croutons!)!
  • Sliced Onions
  • Minced Garlic
  • Diced Tomatoes
  • Basil (fresh basil gives a bright flavor but use whatever is handy for you!)
  • Extra Virgin Olive Oil
  • Red Wine Vinegar
  • Salt and Pepper
  • Sliced Cucumber


Directions:
This time I added peppers to my dressing!
  1. If I can, I make the "dressing" the night before...it really helps the flavors develop! In a mixing bowl add sliced onions, minced garlic, salt and pepper, about half of your basil, olive oil, and vinegar. This is a basic vinaigrette so it has so many uses!
  2. 30 minutes before serving, toss the crusty bread with tomatoes, cucumbers, and your vinaigrette. Let it sit out at room temperature and stir occasionally to get the flavors working together. 
  3.  Top with your remaining basil and serve salad style! 
 Tip: DO NOT PUT THIS IN THE REFRIGERATOR after mixed. It will cause the tomatoes to break down and release their natural waters and will cause your bread to get too soggy. 
 
This isn't the prettiest picture - my kids did the bread tearing for this batch!


 For good measure, here is a gorgeous picture and recipe from The Food Network
CLICK HERE FOR THIS GRILLED PANZANELLA RECIPE

 
I hope you enjoyed this recipe and take away some inspiration to create your own amazing recipes as well create something gorgeous from scraps!
 
Please stop by Frugal Fit Family for more money saving tips, tricks, and recipes to stretch your dollar!

Tuesday, March 24, 2015

Homemade Crispy Kale Chips

 After my many years of struggling with my weight loss goals, I have finally learned one thing....deprivation is detrimental. My unhealthy eating and dieting comes directly from my mother. As a teenager we would regularly go on the "Tuna Fish Diet", "The Soup Diet", or even do an hour of aerobics followed by a large baked potato SMOTHERED in cheese and sour cream....something wasn't working. If these "diets" and methods were the key to losing weight then we would both certainly be skinny. Don't get me wrong we would occasionally see some success and would lose 5-10 pounds only to pack them back on and repeat the process. I carried these yo-yo diets throughout my twenties until I finally figured out what the major problem was....I was depriving myself INSTEAD of building healthy eating habits. If you want to learn more, be sure to follow my website http://www.frugalfitfamily.com

Finally, now - I KNOW BETTER! I learned how to eat and more importantly, how to feed my body with healthier FRESHER foods. I have become addicted to making it to the local Farmers Market as often as I can. They have the best of the best when it comes to local foods and goods made by the people in your neighborhood who can tell you EXACTLY what is in it!

This week, I was again inspired by produce from  "Our Harvest Cooperative"  from the greater Cincinnati, Ohio area who not only grows amazing fruits and veggies but also mixes up some mean culinary concoctions while doing great works all at the same time! They provide foods like salsas, granolas, farm fresh eggs, and more all sustainably grown by local folks! Learn more about them by visiting their Facebook page https://www.facebook.com/OurHarvestCoop and also by checking out their website www.ourharvest.coop . They also provide amazing produce boxes and as someone who loves produce...I can tell you, their stuff is AMAZING!

I crave sweet and salty ALL THE TIME. I had always heard that kale chips were a great substitute for potato chips but I never believed the hype. If I am playing the honesty card, I will admit that they don't taste EXACTLY like potato chips. Kale Chips have their own unique flavor but they are EXCELLENT. They feed your craving for crunchy and salty and are hard to stop eating! They take only about 20 minutes to make and a whole batch of them costs less than $2.00! If you try to buy these babies at the Health Food Store, they will set you back about $8 for a small package!

These kale chips aren't just for dieters! Baked kale is featured on many popular food and cooking shows as an appetizer, garnish, and side dish. You can jazz them up however you want to make them your own.

Yes, they are still green but worth a try!
Yes, Still Green BUT GREAT!

Cook Time

Prep time:
Cook time:
Ready in:
Yields: about 4-6 servings depending on the head of kale

Ingredients

  • 1 bunch Kale
  • 1 teaspoon olive oil
  • 1 teaspoon salt
  • to taste optional seasonings like chili powder, salt, red pepper flakes, curry, etc.

Easy to Make!

  1. Preheat oven to 375 degrees. Spray cookie sheet with non-stick spray (you can use parchment paper if you have it)
  2. Remove thick stems from kale. Wash kale thoroughly under cool running water (kale tends to have particles of dirt trapped in the crevices so wash well). Cut the clean kale into 1 inch pieces.
  3. Toss kale pieces in the olive oil and salt (and any additional seasonings you choose)
  4. Place kale on cookie sheet in a thin layer and bake for about 10 minutes. You will look for the edges to get a bit brown but not burned.
  5. Remove from sheet when cool and START SNACKING!

Make them your own!

There are so many ways to experiment with this recipe. I suggest to first try them as the recipe states and then get crazy! I tend to like mine a bit over cooked with some chili powder.

I WISH I KNEW WHAT MY FIRST BATCH WAS LIKE! I tasted one "chip" from my first batch when my children hijacked the whole bowl. I will say that they are the type of kids who would choose an apple over potato chips and are constantly asking if what they are eating is "healthy". I would like to think that this is because I have taught them better than I was taught as a child....... but you never know, it could have more to do with the amount of children's media regarding healthy diets. I choose parental influence:) Either way, these kale chips were a hit with us ALL!

Enjoy and please let me know of any variations you try and LOVE!


So, what will inspire you this week at the Farmers' Market? Stay tuned to see what inspires me each week at the West Chester, Ohio Farmers Market! You can follow the market on Facebook by clicking HERE.

The Summer Market will take place on Center Pointe Drive between the roundabout and Mid Pointe library from 9 am to 1 pm every Saturday http://westchesterohiofarmersmarket.org/ has more information and details about dates and vendors!

GO OUT, SHOP LOCAL,  AND GET INSPIRED!
 
I hope you enjoyed this recipe and will continue to follow my site Frugal Fit Family! You can follow me on Facebook and Twitter to stay up to the minute with my favorite recipes, organic living tips, and DIY green beauty potions!

Tuesday, February 3, 2015

Super Easy Organic Homemade Crepes!

When I was younger, I used to love going to breakfast and ordering crepes. Not only did I feel a little "fancy" but they were something that I didn't get at home. Sure, ordering pancakes was good too BUT mom made pancakes all the time at home so I wanted something different. Even as an adult...I LOVE a great crepe. Small shops seem to be popping up everywhere and including toppings like fresh fruit, savory cheeses, and even liquor infused crèmes (YUM, btw) so my love affair has continued into  my adulthood.

I realized jut the other day that I had never introduced my kids to my friend "The Crepe". I guess I always thought that they were tough to make which was why I didn't get them at home a lot as a kid...luckily for me, I found that they are actually just as easy as pancakes to make and were a nice break from the norm.

To make crepes, you only need a few ingredients that most folks have in their pantries....while gathering, set your pan on medium high heat and coat with oil. We opt for coconut oil in our house...here is WHY!  Now, I used ALL organic ingredients but feel free to use whatever you like!
  1. 1 cup of Flour
  2.  2 Eggs
  3. 1/2 cup of milk
  4. 1/2 cup of water
  5. 1/4 teaspoon of salt
  6. 2 tablespoons of melted butter
  7. 2 teaspoons of sugar (not all recipes call for this but I still add it :)
It honestly is really simple.
  1. Mix ingredients together to form a smooth batter
  2. Gently ladle some batter into your heated pan.
  3. Either GENTLY use your ladle to make the round crepe or gently rotate the pan allowing the batter to make it's own circle. It should be a super thin "pancake"
  4. Allow the crepe to begin browning then gently use a spatula to lift and flip.
  5. DONE
We were happy with the results!


Now you can fill those crepes with whatever you like! Today my
kids chose Chocolate, Peanut Butter, & Banana (you can snag the Vegan Chocolate Sauce recipe HERE) and Sweet Crème and Berry. Trust me, they all sound fancier than they are....Sweet Crème for us is just sour cream with some sugar and juice!

Let me know how you like to fill (OR TOP - just in case that is the correct way) your Crepe!

Hope you enjoy!
 

Sunday, January 18, 2015

DIY Balsamic Glaze Recipe


I will be the first person to admit that my love for balsamic glaze goes way beyond love.. I am an addict. There is almost nothing in this world that isn't made better by this dark & sweet glaze: pizza; tomatoes; salads; fruits...yep, the list goes on and on. I always ask for it in restaurants when available but have never purchased it for my home due to one main thing...COST.

As we all know, I am first- organic and second -frugal and sadly the options on the retail market didn't fit either. The ingredients lists on most available glazes have things like added sugar, modified starches, and stabilizers - none of which fit my diet needs and the cost is typically a few times higher than a regular bottle of balsamic vinegar!

So, I finally decided it was time to do a little DIY. I was happy to find that making your own glaze was sooo easy!  It really is just reduced balsamic vinegar. You only need one ingredient!
You CAN make it Organic!

What you will need:
Balsamic Vinegar (any brand)

Directions: This honestly can't get any easier
  1.  Pour 2 cups of balsamic glaze into a pan and bring to a simmer
  2. Reduce Heat and let it go for about 20-30 minutes.
  3. Continually check your glaze as burnt vinegar does NOT smell good!
  4. Let it cool and enjoy it. You may find that your glaze gets very firm when stored in the refrigerator. No problem! Just warm it slightly in the microwave before using .

That's it! It is honestly that easy! When your reduction is finished, you will have about 1/4 of the vinegar that you started with. Use this dark goodness on pizzas, pork & chicken dishes,  breads, salads, and even strawberries for a classy sophisticated touch.

Once you make the traditional glaze, you may find yourself wanting to experiment! You can start getting creative by adding in things like fresh herbs and spices. Some people may like to add a little bit of sugar to the vinegar before it simmers to kick up the sweet notes. If you are really feeling sassy, throw in a few blackberries!

If you are looking for something exciting to try your new glaze on...try my O-O Mushetta Pizza! It's inspired by the Holy Shitake pizza from Mellow Mushroom and is a real crowd pleaser!

I promise that the pictures don't do it any justice!

I hope you enjoy your glaze! Be sure to follow me on social media to keep up with all of my healthy and frugal living tips!


Are you addicted to balsamic glaze like I am!? What do you put your glaze on?

Monday, November 10, 2014

Healthy Homemade Ice Cream

I am going to be honest here...I have seen this recipe a few times and never thought that 1) it would actually work and 2) that my kids would accept it as an ice cream replacement. Great news for me....both actually happened.

There are a few reasons that this recipe is now a favorite in my house. The first...it's super inexpensive to make! I am easily able to grab clearance bananas to use which are always marked down at my grocery store to like 19 cents a pound! The second...the health factor is so amped up here. No added sugar, no preservatives, no artificial flavorings...just FRUIT. The third is pretty simple....It tastes great! It has a creamy texture and you can easily add other fruits for different flavors: strawberries, blueberries, peanut butter, blackberries, chocolate chips, etc! As you can see by the photo, my kids opted for chocolate chip. I really didn't feel bad adding them since it was just bananas and chocolate chips!

The steps are SOOOO EASY to do and your kids will love helping!

1) Slice bananas into small discs and freeze in containers or baggies.
2) Load frozen bananas into food processor.
3) BLEND!

Those 3 steps will produce a super creamy "ice cream" that is packed with nutrients and low in calories. It also makes organic ice cream an affordable treat (that crap is expensive at the store!)

I hope you enjoy this recipe and try it at home.

Sunday, October 5, 2014

Super Easy ORGANIC General Tso's Sauce Recipe

When my family and I began our healthy eating journey, we easily gave up having "junk food" around the house", eating fast food, and had no problems choosing organic vs. traditional. We made a pretty smooth transition but after time found that we missed some of our favorite dishes like General Tso's from our neighborhood Chinese restaurant.

This was one dish that I was VERY afraid to try making at home. I have mastered pizza, tortillas, desserts...BUT I was afraid that I wouldn't be able to match the General's Tofu we were used to. I still had to try because the cheat nights at the Chinese restaurant were filled with processed ingredients and sugar. If I could make it myself....we could have it more often without having a cheat day :)

I saw many recipes online and to be honest...some were pretty intimidating. May recipes called for a number of ingredients and most were items that I simply don't keep around the house. The recipe that I ended up with may NOT be a traditional General Tso's BUT it was one that I can make with ingredients that I keep around the house and it was extremely kid friendly!

TIPS:
  • If you are looking for a spicy alternative, you can add fresh jalapenos, sriracha, or dried red pepper flakes. You can also add 1 teaspoon of ginger for extra zing :)
  • Also note that this recipe calls for cornstarch...if you don't have any on hand - simply make a basic roux with butter and flour then add your sauce to it and bring to a simmer!
  • I used all organic ingredients BUT you can use whatever you want
  • If you want to reduce the sugar, try adding more orange juice or stevia!
  • Try blending in 2 tablespoons of peanut butter!
This recipe was just enough for two people..I had to make a triple batch!

INGREDIENTS:
  • 3 tablespoons soy sauce
  • 1/2 squeezed orange
  • 3 tablespoons of sugar
  • 3 tablespoons rice wine (any cooking wine works)
  • 2 teaspoons of cornstarch
  • 2 tablespoons rice wine vinegar
  • 1 teaspoon of minced garlic
DIRECTIONS:
  1. Add all ingredients minus cornstarch and bring to boil to allow the sugar to dissolve.
  2. Wisk in cornstarch and reduce heat.
  3. Your sauce will quickly thicken and be ready to serve over veggies, chicken, beef, or tofu!
I hope you enjoy this version of General Tso's sauce and that it helps to keep you on track with your healthy living goals!

Thursday, September 25, 2014

Organic Coffee's for My Keurig Exist!!! Even Decaf!

Collage_bcg39eweq0au-i6milf1-g20140925-2-1uww0qqjpg?1411652376
I was so happy when I received the email saying that I was chosen to receive a free Keurig 2.0 from Influenster. No joke, I felt like I won the lottery! This thing is AMAZING! Huge beautiful screen, can brew coffee at any set time, and best of all has a large CARAFE so when I am having friends over, there is no need to brew one cup at a time! I plan to go over more features in another post because there is so much to say!smiley

I want to focus on some organic options for any Keurig!

I remember buying my husband our first Keurig a few years ago. We were just starting our organic journey and were excited to see what was out there in the way of organic options...we were kinda sad to see that our local grocery store had NONE! Everything we saw had artificial ingredients and flavors. I was starting to think that I had finally broken down and spent the money on a great machine that would either sit useless or cause us o abandon our new lifestyle. Happily for us...we found some great organic options just a few clicks away!

Keurig - man's Own Organics K-Cup Portion Pack for Keurig K-Cup Brewers, Newman's Own Special Blend, 24 Count

Keurig - man's Own Organics K-Cup Portion Pack for Keurig K-Cup Brewers, Newman's Own Special Blend, 24 Count
This one is a pretty great value! $.71 per cup :)
Keurig - man's Own Organics K-Cup Portion Pack for Keurig K-Cup Brewers, Newman's Own Special Blend, 24 Count - $16.90, 4.99 shipping - Available at Amazon.com Marketplace

Keurig - WICKED JO: 12 Single Serve Cups, SingleCup Jo is for Keurig K-Cup Type Brewers, Bold, Dark, Organic French Roast Coffee, Pure 100% Arabica Coffee, No Additives, USDA Certified Organic, Gourmet Coffee from the Jo Coffee Collection

Keurig - WICKED JO: 12 Single Serve Cups, SingleCup Jo is for Keurig K-Cup Type Brewers, Bold, Dark, Organic French Roast Coffee, Pure 100% Arabica Coffee, No Additives, USDA Certified Organic, Gourmet Coffee from the Jo Coffee Collection

Keurig - Van Houtte Cafe Swiss Water Decaf, Fair Trade & Organic Light Roast Coffee for Keurig Brewers, 24-Count K-Cups (Pack of 2)

Keurig - Van Houtte Cafe Swiss Water Decaf, Fair Trade & Organic Light Roast Coffee for Keurig Brewers, 24-Count K-Cups (Pack of 2)
This one is a little pricier BUT is going to give you tons of decaf flavor and a real coffee house feel. They use a special process to decaffinate the coffee using only water!
Keurig - Van Houtte Cafe Swiss Water Decaf, Fair Trade & Organic Light Roast Coffee for Keurig Brewers, 24-Count K-Cups (Pack of 2) - $44.98, Free shipping - Available at Amazon.com Marketplace

Keurig - "Zaire" Congo Kivu Organic Coffee, 48 ct. FRC Cups for Keurig K-Cup Brewers, Fresh Roasted Coffee LLC

This one is from Africa and boasts some great flavors!
Keurig - "Zaire" Congo Kivu Organic Coffee, 48 ct. FRC Cups for Keurig K-Cup Brewers, Fresh Roasted Coffee LLC - $29.95, Free shipping - Available at Amazon.com Marketplace

Keurig - Nicaraguan Fair Trade Organic - K-Cups

Keurig - Nicaraguan Fair Trade Organic - K-Cups
Another great deal and Fair Trade!
Keurig - Nicaraguan Fair Trade Organic - K-Cups - $17.45, 8.95 shipping - Available at Keurig Canada

Disclosure: This post contains affiliate links provided by Postpresso.

 
BLOG TEMPLATE BY DESIGNER BLOGS